Analytics is one of the ways in which you can know how users use your app and I think it’s very important to know how users use your app. It’s one of the things that we (or I) use at My Day To-Do (MDT) to encourage usage of certain features. What do I mean? I have written in the past that about my Software engineering background and as such my UI/UX skills are not the best. So the first think I think about when users don’t use certain features of my app is probably because they don’t know about it. Hence to compensate for that, I monitor how the app is used, so I know if the users aren’t using the features I think they should, I will add visual cues in the app to make the feature obvious for them. In almost all of the apps that I have developed at My Day To-Do, I have used Firebase Analytics to monitor app usage. In this post, I will just be talking about how to setup an iOS app with Firebase, provide some sample analytics code of the Github repo that I made for this post.
Background
Love this pay per use pricing model, it’s one of the best things to happen for small software based startups. One of the things that early stage startups are always short off, are funds or in our case, a significant lack of it. Firebase falls into this category and is an awesome tool for startups (I am not getting paid by Google to say this).
p.s. I won’t be talking about things such as how to access the Firebase console or creating a Firebase account, there are others that already do a good job of it. Hence, it’s not the best use of my time.
Setup
Let’s pick up from the point, of adding Firebase SDK to your app in the Firebase project creation lifecycle
Add firebase SDK to the project
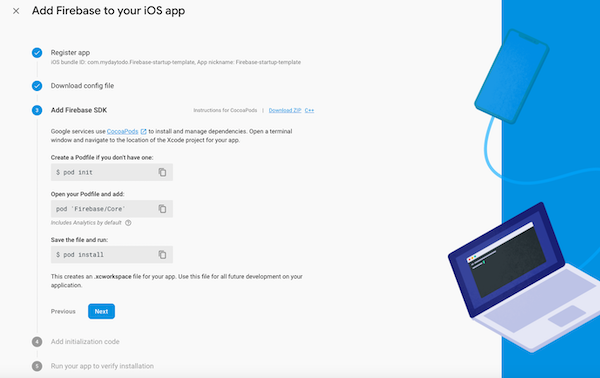
For this tutorial, in addition to Firebase/Core, let’s also add Firebase/Analytics, remember the focus of this tutorial is to serve as a iOS app Firebase Analytics template. So in the terminal go to the directory where you have created the Xcode project, in my case it’s
/workspace/iOS/OpenSource/ios-firebase-project-template
run the Pod init command and open the newly created Podfile via vim Podfile, move the cursor below
#Pods for Firebase startup template, hit the i key and add the following
pod ‘Firebase/Core’
pod ‘Firebase/Analytics’
You can save and exit by pressing esc, type wq and hit enter (return) key. Your Podfile should look something like this,
# platform :ios, '9.0'

target 'Firebase startup template' do
  # Comment the next line if you're not using Swift and don't want to use dynamic frameworks
  use_frameworks!

  # Pods for Firebase startup template
  pod 'Firebase/Core'
  pod 'Firebase/Analytics'

end
Once saved, run Pod install
After everything is installed, you will notice that Firebase has created a new file i.e. .xcworkspace (which is a directory, read more about it here). Open your project in Xcode using that and remember, to always use that to open your Xcode project. In it, just add
import Firebase
and FirebaseApp.configure() in the AppDelegate as instructed on the console. Once you have added, this run your project and the Firebase servers should know your setup is complete.
Phew!!!! Now that we have that setup out of the way, we can start on the good stuff!
Xcode Project template
You can find the code repo on Github over here. In the Firebase docs, you will see that, there are lots of events that we can log (or track), however in this project, we are only interested in tracking, login, share and swipe events. Hence we will look at
- Login: official docs link
- Share: official docs link
- SelectContent: official docs link (to track left or right swipes)
The Xcode project is very straight forward, it’s a single view application with 2 buttons to track login and share and a UIView to track swipe gestures.
Ok before we move on, you may notice some unknown code i.e. Feedback helper, well that’s a really simple class that I add to almost all my iOS apps.
import Foundation
import UIKit
class FeedbackHelper {
    static let fbh = FeedbackHelper()
    func generateHapticFeedback(for impactFeedbackStyle: UIImpactFeedbackGenerator.FeedbackStyle) {
        if #available(iOS 10.0, *) {
        let impactGenerator = UIImpactFeedbackGenerator(style: impactFeedbackStyle)
        impactGenerator.impactOccurred()
      }
   }
}
 Haptic feedback is awesome and I think every app must make use of this. Now let's look at the code for the login and share functions.
@IBAction func login(_ sender: Any) { FeedbackHelper.fbh.generateHapticFeedback(for: .heavy) AnalyticsHelper.logSignInEvent() } @IBAction func share(_ sender: Any) { FeedbackHelper.fbh.generateHapticFeedback(for: .heavy) AnalyticsHelper.logFirebaseShareEvent() }
So how does this work in practice? You push the share or login button on the app, it calls these functions, executes whatever auth or share code, generates some haptic feedback and then logs the event to Firebase. Now, before I talk about the Analytics Helper, let’s look at the Swipe actions code.
@IBAction func swiped(_ sender: UISwipeGestureRecognizer) {
    switch sender.direction {
        case .left:
            swipeDirectionLbl.text = "You swipped left"
            AnalyticsHelper.logSelContentEventForFirebase(analyticsConstant: AnalyticsConstants.SWIPE_LEFT)
            break
        case .right:
            swipeDirectionLbl.text = "You swipped right"
            AnalyticsHelper.logSelContentEventForFirebase(analyticsConstant: AnalyticsConstants.SWIPE_RIGHT)
            break
    default:
        break
    }
}
For this one, we determine what the swipe gesture was, update the UILabel and then log an event to Firebase. This one’s a little different as we are logging a Select Content event using a custom data structure i.e. AnalyticsConstant.
Now let’s look at the AnlayticsHelper class
class AnalyticsHelper {

    static func logSelContentEventForFirebase(analyticsConstant: AnalyticsConstants.ANALYTICS_CONSTANT) {
        Analytics.logEvent(AnalyticsEventSelectContent, parameters: [
         AnalyticsParameterItemID: "id-\(analyticsConstant.id)" as NSObject,
         AnalyticsParameterItemName: analyticsConstant.name as NSObject,
         AnalyticsParameterContentType:  analyticsConstant.type as NSObject
         ])
    }
    static func logEventAppOpen() {
        Analytics.logEvent(AnalyticsEventAppOpen, parameters: nil)
    }
    static func logFirebaseShareEvent() {
        Analytics.logEvent(AnalyticsEventShare, parameters: nil)
    }
    static func logSignInEvent() {
        Analytics.logEvent(AnalyticsEventLogin, parameters: [AnalyticsParameterSignUpMethod: "email"])
    }
}
The appOpen, logSignIn or share methods are pretty straight forward, what’s different is the selContentEventForFirebase which takes a parameter of type ANALYTICS_CONSTANT. Here’s what that class looks like, it’s basically got
class AnalyticsConstants {
struct ANALYTICS_CONSTANT {
    var id = ""
    var name = ""
    var type = ""

    init(id:String, name: String, type: String) {
        self.id = id
        self.name = name
        self.type = type
    }
}
static let SWIPE_LEFT = ANALYTICS_CONSTANT(id: "swipe_left", name: "Swipe Left", type: "Swipe")
static let SWIPE_RIGHT = ANALYTICS_CONSTANT(id: "swipe_right", name: "Swipe Right", type: "Swipe")
}
This is just a convenience class to log one of the many select content events through your app. Doing it this way just makes it easier and the app more maintainable in the long run.
Summary
Have a look at the ios-firebase-project-template repo on Github, it’s short, simple and can get you started with tracking how users use your app. I cannot stress this enough, keep track of how users use your app, it will help you understand their behaviour, leading you to take steps to help retain them. If you have any questions, then please leave a comment here. Additionally, I use Firebase, if there’s any other Analytics tool, that you use and think it’s great, then feel free to share in a comment. Hope you found this post useful.
As usual, if you find any of my posts useful and want to support me, buy or even try one of our products and leave us a review on the app store.


Comments